Select images
The main step to operate with the list of photos in the album.
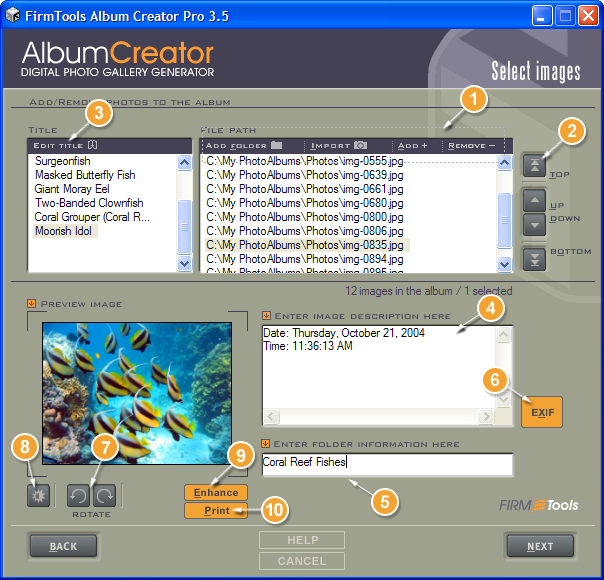
- Use these buttons to add/remove photos to your album project:
- Click Add to add one or more photos from the single folder to the album;
- Click Add Folder to add all images located in the folder and all its subfolders;
- Click Import to add images from a scanner or a digital camera that has a TWAIN support (most of the cameras supports removable media—there is no need to use TWAIN importing);
- Click Remove to remove the selected photo(s) from the project.
- Place the photos in the desired order using these buttons:
- Click Up/Down to move the selected photo(s) up or down in the list;
- Click Top/Bottom to move the selected photo(s) to the top or bottom of the list (to the begining or the end of the album).
- In the Title list, double-click the photo of your choice
(or select it and click Edit Title) to change the title of the photo.
You can use keyboard shortcuts to perform some batch operations with the titles.
- In the Image Description text box enter the description for the selected photo.
- In the Folder Information text box enter the folder
(category) information for one or more of the selected photos. Use "/" or "\" to
set a multi level category (for example, San-Diego/Zoo/Monkeys).
Not all themes have a folder support, only some of the flash themes do. If the theme does not support folders this text box will be hidden.
- Click EXIF to open an additional dialog that will allow you to import image metadata to the titles or descriptions.
- Use these buttons to correct the photo orientation (your original images are not affected, lossless rotation).
- Click this button to auto fix the color balance of the selected photo (your original images are not affected).
- Click Enhance to start the PhotoEnhancer application to edit the selected photo(s) (fix red-eyes, crop or correct the colors). Available in the PRO and Basic versions only.
- Click Print to print the selected photo(s) using the FirmTools PhotoPrinter (if installed).